
This chapter contains the following topics:
Functions Common to All Statements
Operating Statement Format Statements
Balance Sheet Format Statements
This chapter describes the different function codes used in entering Financial Statement Layouts. The Financial statement layouts (Enter) selection has been described in the Financial Statement Layouts chapter.
| • | The screen and fields you use to enter the layouts are described. |
| • | Printing accounts, using account numbers, cost centers or subaccount numbers, and features such as wild-cards and account ranges, are described. |
| • | The functions which are common to all kinds of layouts are described. |
| • | Subtotaling is described. |
| • | The features of Operating Statement format layouts are described, along with functions used only with them. |
| • | The features of Expanded Cash Flow layouts are described. |
| • | The features of Balance Sheet format layouts are described, along with the function used only with them. |
| • | An index to all the function codes is provided. |
Each line contains five fields across the screen, resulting in five columns:

Funct
The first field is used to enter the function code desired. Function codes are discussed later in this chapter. So that we may continue, you must enter function ACCT. This function is used whenever you are entering an account to be either printed or accumulated.
Account numbers may be entered with a cost center or subaccount number (if you use either feature). As described later in the section titled Printing Accounts, you may use wild-carding for cost centers and subaccounts.
The next four fields on the right are used only when entering an account number or when a balance is to be printed.
Options
This is the type of balance you want to print on this line. The types are:
For Operating Statement format:
|
N |
Net change for the reporting period (this is the sum of types D and C below). This is the usual balance type for Operating Statement format. This type is automatically set for Cash Flow Statement and Analysis of Changes in Working Capital. |
|
B |
Balance as of the beginning of the reporting period. |
|
E |
Balance as of the end of the reporting period (this is the sum of types B above and C and D below). |
Options
For Operating Statement format (Expanded Cash Flow Statement only):
|
N |
(as above) |
|
B |
(as above) |
|
E |
(as above) |
|
D |
Gross debits for the reporting period. |
|
C |
Gross credits for the reporting period. |
You may also enter a minus sign to reverse the sign of the printed balance.
Options
For balance sheet format:
|
E |
Balance as of the end of the reporting period. This type is automatically set for balance sheets and supporting schedules (balance sheet format). |
|
N |
Net change for the reporting period. This type is automatically set for Statement of Changes in Financial Position. |
This field determines if you want an account balance to print on the statement at this point, or whether to accumulate (store) this balance and include it in a total to be printed on a subsequent line.
The choices are either P (print the balance) or A (accumulate the balance).
The use of this field is illustrated in the section titled Printing Accounts later in this chapter.
This field is used only when a balance is to be printed on a balance sheet format and when Prt/Accum is P.
The balance sheet format has three preset column positions in which a balance can be printed. Enter the number of the column in which you want the balance printed: 1, 2, or 3.
For example, you can use print columns to show totals as follows:
|
Cash - First National Bank |
2,000.00 |
|
|
|
Cash - First State Bank |
1,000.00 |
|
|
|
Cash - City Bank and Trust |
4,000.00 |
|
|
|
Total Cash in Bank |
|
7,000.00 |
|
|
Petty Cash - Dept 100 |
500.00 |
|
|
|
Petty Cash - Dept 200 |
300.00 |
|
|
|
Total Petty Cash |
|
800.00 |
|
|
Total Cash |
|
|
7,800.00 |
The Operating Statement format does not use this field.
When printing financial statements, it is customary to use parentheses for account balances when they contain atypical amounts. For example, if an accounts receivable account contained a credit balance, it would usually have parentheses on a financial statement.
A parentheses control code is entered for each account in the Chart of Accounts. The code D is used to specify that the account is to have parentheses if it has a debit balance. The code C is used to specify that the account is to have parentheses if it has a credit balance. Thus, an accounts receivable account would have a parentheses code of C; an accounts payable account would have a parentheses code of D.
When a single account is entered on a layout, the parentheses control field on the layout line is skipped and the parentheses control contained in the Chart of Accounts record for the account is used when printing the financial statement. However, when wild-cards are used (to print a set of accounts), when a subtotal is to be printed, or when a set of accounts have been accumulated to print one summary balance on the financial statement, you must specify the parentheses control to be used.
Options
The choices for parentheses control are:
|
C |
Use parentheses when credit (use if the balance is typically debit) |
|
D |
Use parentheses when debit (use if the balance is typically credit) |
This field is only entered for these types of financial statements:
| • | Operating Statement |
| • | Balance Sheet |
| • | Supporting Schedule (Operating Statement format) |
| • | Supporting Schedule (balance sheet format) |
| • | Expanded Cash Flow Statement |
|
Note |
On the Expanded Cash Flow Statement, you may enter parentheses control for a single account. The default provided on the screen is from the Chart of Accounts record for the account. You may override this as needed. |
Throughout the remainder of this chapter, examples are used to illustrate the features of financial statement layouts. In each example, a layout is shown first, followed by the financial statement that would result from using that layout. The examples shown reflect specifications as follows: For Operating Statements, columns with the current period actual amounts and the year-to-date actual amounts. For Balance Sheets, columns with the current ending balance only. Use these examples to compare the various layout function codes with the results they produce.
On the example layouts shown, only the fields pertinent to the feature being described are filled in.
On the sample statements shown, horizontal spacing is narrower and amount fields are smaller than they would actually appear on a statement.
Some of the main account numbers and subaccount numbers used in the examples only illustrate features, and are not in the Chart of Accounts which we recommended you set up.
We suggest that you review the examples to become familiar with entering accounts and functions. When you are familiar with these, for practice you may want to enter the layouts printed on the Financial Statement Layout Edit List in the Sample Reports appendix.
This section describes how to either:
| • | Print accounts, or |
| • | Accumulate a set of accounts, which are summarized into one line printed on the statement. |
An account balance may be either printed on the statement, or the balance may be accumulated (stored) and included in a total to be printed on a subsequent line.As noted earlier, in the Prt/Accum field, you enter either P (print the balance) or A (accumulate the balance).
If you want an account’s own balance to print, code it with P at Prt/Accum ?.
For example, each of the two cash accounts shown below would be printed with its own balance on the financial statement, if you coded the layout like this:
Layout Entered (Balance Sheet Format):

Resulting Statement:
|
Petty Cash - Dept 100 |
500.00 |
|
Petty Cash - Dept 200 |
300.00 |
Often you may want to accumulate the balances from several accounts and print only the total balance as a summary amount. To do so, code the accounts to be accumulated with an A. The balance of each account coded with an A is added to an accumulator. This accumulator is a storage location which contains the total of all accounts which have been coded with an A. To print (and clear) the accumulated total, use the PAT code:
|
PAT |
(Print accumulated total) |
This code prints the total of a set of account balances which you accumulated (Prt/Accum = A above).
In other words, PAT summarizes the accounts which were coded A (accumulate).
Layout Entered (Balance Sheet Format):

Resulting Statement:
|
Total Cash |
11,000.00 |
On the statement, only one balance appears, with the description you entered: Total Cash. This balance includes the totals from accounts 1040-100 (assumed to be $4,000), 1040-200 ($2,000), and 1040-300 ($5,000).
When the PAT code printed the accumulated total ($11,000), it also set the accumulator back to zero.
Accumulated balances (Prt/Accum = A) that are not followed by a PAT will not be printed or have their balances included in subtotals on the statement.
|
Note |
You may accumulate accounts and then print them by entering the accumulated accounts followed by a single account with a P code instead of a PAT. The total of the accumulated amounts, plus the account marked with the P, will be printed as the account balance for the account marked with the P. This method of accumulating accounts is allowed, but not recommended. An example of the drawbacks of this method is given later in this chapter. |
(After you enter the PAT code, a field appears for printing accounting ratios.If no accounting ratios are to be printed on the statement, leave this field blank. Refer to the section titled Accounting Ratios later in this chapter.)
For a PAT code, Parentheses control is requested for these layout types:
Operating Statement
| • | Balance Sheet |
| • | Supporting Schedule (Operating Statement format) |
| • | Supporting Schedule (balance sheet format) |
| • | Expanded Cash Flow Statement |
Enter D or C, as appropriate.
Also, if the statement is a balance sheet format (Balance Sheet, Supporting Schedule, or Statement of Changes in Financial Position), a Print column is requested. Enter 1, 2, or 3.
|
Note |
A similar function (PATR - Print accumulated total for dollar rounding) is described in the section titled Balance Sheet Format. |
When coding a statement for multiple cost centers or subaccounts, you can take advantage of the fact that an account or PAT with a zero balance or net will not be printed on a financial statement.
For instance, if you have an expense which does not occur for a particular cost center, you can still accumulate all the cost center into a PAT. Then for the cost center that does not have that type of expense, the net of the PAT will be zero (when printing the layout for just that cost center) and the PAT code will not print at all on the statement.
Layout Entered (Operating Statement Format Layout):

Assume that the accounts have the following nets for the reporting period and year to date:
|
|
RPT |
YTD |
|
RPT |
YTD |
|
|
ACCT |
$200 |
$500 |
ACCT |
$550 |
$800 |
|
|
ACCT |
$400 |
$600 |
ACCT |
$700 |
$900 |
|
|
ACCT |
$300 |
$900 |
ACCT |
$100 |
$200 |
|
|
ACCT |
$0 |
$0 |
ACCT |
$450 |
$700 |
|
|
ACCT |
$150 |
$200 |
ACCT |
$500 |
$800 |
If you select this layout for cost center 300, you get:
Resulting Statement
|
|
Reporting period |
Year-to-date |
|
|
Amount |
Amount |
|
Travel Expenses |
450.00 |
700.00 |
The purpose of a wild card is to reduce the number of entries required to create a layout.
Wild-cards are symbols which can be entered in lieu of cost centers or subaccounts to represent multiple occurrences of either.
| • | If your account structure does not include sub accounts, wild-carding is not available to you. |
For simplicity, the examples in this chapter assume that you are using main and subaccount only.
For example, assume you use the following accounts in the Chart of Accounts: 8300-000, 8300-100, 8300-200, 8300-300, and
8300-400.
The symbol *, appended to the main account number 8300 (8300-*), stands for all of these accounts.
The wild-card symbols and their effects are listed below:
|
* |
Stands for all occurrences of any character in this position and any subsequent positions of this segment. When used, this symbol is the last or only symbol in the segment. |
|
+ |
This is a variant of the preceding, and stands for all occurrences except null occurrences. A null cost center or subaccount segment means one that is zero if defined as numeric or as alphanumeric and zero-filled, blank if defined as alphanumeric and space-filled. The word null is here used to mean either zero or space, depending on how the segment is defined. |
|
? |
Stands for any character in that position of the segment. Thus 56?8 matches 5678, 5638, and 56W8 (but not 3678 or 5679) |
|
% |
This is the same as the preceding except that it excludes a null character (space or zero, depending how the segment is defined) |
Readers familiar with MS-DOS will recognize that these uses of * and ? are the same as the conventions for file names used in the MOVE, COPY, and similar commands.
Assuming the same subaccounts and balances as the previous
example, this layout:
Layout Entered (Operating Statement Format Layout):

results in this:
Resulting Statement:
|
|
Reporting period |
Year-to-date |
|
|
Amount |
Amount |
|
Utilities |
950.00 |
1,700.00 |
|
Travel Expenses |
1,750.00 |
2,600.00 |
In other words, the balances from accounts 8300-000 and 6050-000 are not included.
|
Note |
Numbers followed by ?’s means all subaccounts beginning with the numbers entered. Numbers followed by %’s means all subaccounts beginning with the numbers entered, except those ending with nulls. |
If you used three-digit subaccount numbers and accounts 4000-500, -510, -520, -530, and -540, you could enter 5?? to stand for all those accounts:
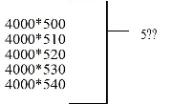
If you used three-digit subaccount numbers and accounts 4000-500,
-510, -520, -530, and -540, you could enter 5%% to stand for all those accounts except 4000-500:

This example assumes that the segment is numeric; if it had been alphanumeric and space-filled, 500 would have matched 5%% (but 5 would not).
Observe also that when two %’s are adjacent, they are evaluated together. To take an example, and with the assumption that the segment is numeric, 7%%8%9 will exclude 700839 and 712809, but will include 702879 and 720879.
The difference between using ?’s and %’s is like the difference between * and +. The part of the subaccount which the wild-card represents and which is all nulls is either included or excluded.
If you used 5-digit subaccount numbers, you could enter 33??? to stand for 4000-33000, -33100, -33110, -33200, etc.
Wild-cards are used in other ways besides with PATs. For instance, if you enter Prt/Accum = P on the line that has the wild card, the accounts matching the wild card would be printed.
For example, 8300-* would print 8300-000, -100, -200, -300, and -400.8300-+ would print 8300-100, -200, -300, and -400.
These wild-card characters have been included to allow you to exclude accounts with subaccounts which are all nulls, or contain trailing nulls, as shown in the examples above.
The + character is useful if you need to construct an Operating Statement layout which excludes the null subaccount or cost center. This can occur if you have a few Operating Statement accounts which use a null subaccount while the remainder of the Operating Statement accounts use subaccounts which are non-null. Using the + character instead of * ensures that no account with a null subaccount will be included on a Operating Statement.
The % character can be used in a similar fashion, where needed, in more complex situations where it is necessary to exclude accounts with trailing nulls from being included in the set of accounts encompassed by the wild-card.
Account ranges
An account range refers to a set of accounts which you specify by entering starting and ending main account numbers.
The purpose of entering an account range is to reduce the number of entries required to create a layout.
Account ranges may be used with or without wild-cards in the subaccount field. During entry of the account range, you may either enter a single subaccount number or use a wild-card.
For example, suppose you want the layout to include only the -000 accounts from this set:
|
1100-000 |
Accounts receivable - Trade |
|
1100-100 |
Accounts receivable - Employee |
|
1100-200 |
Accounts receivable - Vendor Refunds |
|
2000-000 |
Accounts payable - Trade |
|
2000-100 |
Accounts payable - Taxes |
|
2000-200 |
Accounts payable - Supplies |
You could enter a range of accounts:
|
RNG |
Beg 1100 |
End 2000 |
subacct 000 |
This stands for accounts 1100-000, 1200-000, and 2000-000.
You can also use ranges and wild-cards together to reduce the number of entries required. The accounts shown above could all be included in the layout if you entered:
|
RNG |
Beg 1100 |
End 2000 |
subacct * |
Or, if you wanted to exclude the accounts with a -000 subaccount:
|
RNG |
Beg 1100 |
End 2000 |
subacct + |
Many functions can be used on all types of statements. They are described here, and the resulting appearance of the financial statement is shown. They are described in this order: The ACCT and FULL account number entries, the lay-out functions, and functions used to calculate, print, and clear subtotals.
The functions used to lay out text are:
|
LF |
Line feed (skip a line) |
|
FF |
Form feed (start a new page) |
|
UL |
Print an underline |
|
DL |
Print a double underline |
|
LEG |
Print a predefined legend (heading) |
|
TXT |
Print text from the Text File |
|
LIT |
Print a literal (a literal is a line of text) |
The functions used to calculate, print, and clear subtotals are:
|
SUB1-SUB9 |
Print the subtotal for the level specified by the number (1 is the lowest level, 9 the highest) and clear the subtotals at the level specified and all preceding lower levels |
|
CLS1-CLS9 |
Clear the subtotal at the level specified and at all preceding lower levels, without printing a subtotal |
Each of the common functions is described in this section.
Account Number: the main and sub accounts, excluding cost center
The ACCT code allows you to enter the account number. This is only the main account and sub account segments (if used).
If cost centers are used they will be combined from the statement specification for each column when the actual financial statement is generated.
Full Account Number: the cost center, and the main and sub account number segments
The FULL code allows you to enter the cost center and the main and sub account numbers.
When the financial statement is generated the amounts from the full account number will print in any column that includes the cost center of this account.
Line Feed
LF causes one or more lines to be skipped on the statement, depending on how many lines you specify.
Form Feed
FF causes a new page to be started.
Underline
UL causes an underline to be printed. For a balance sheet format, you specify in which column it is to appear: 1, 2, or 3.
Double Underline
DL causes a double underline to be printed.For a balance sheet
format, you specify in which column it is to appear: 1, 2, or 3.
Legend
The LEG code causes a predetermined legend to be printed on the financial statement. One line is skipped after the legend, so that a LF (line feed) following it is not necessary.
For balance sheet format statements, LEG prints the current period ending date.
For Operating Statement format statements, LEG prints a description of the current period, column headings, and (if used) a description of the subaccount or subaccount group for which this statement is being printed.
The layout entries shown next (for an Operating Statement format statement) and the resulting statement illustrate the use of LF, UL, and LEG.
|
Note |
This example uses subtotals in a simple fashion. Subtotals are described in detail later in this chapter. If needed, you can refer to the section on subtotals in order to fully understand this example. |
Layout Entered (Operating Statement Format Layout):
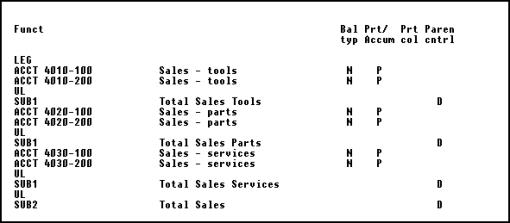
Resulting Statement:
|
For the period 04/01/97 to 04/30/97 |
|||||
|
|
Reporting period |
Year-to-date |
|||
|
|
Amount |
Amount |
|||
|
Sales - tools |
$ 4,000.00 |
$ 15,000.00 |
|||
|
Sales - tools |
3,000.00 |
10,000.00 |
|||
|
|
------------ |
------------ |
|||
|
Total sales tools |
7,000.00 |
25,000.00 |
|||
|
|
|
|
|||
|
Sales - parts |
$ 9,000.00 |
$ 17,000.00 |
|||
|
Sales - parts |
5,000.00 |
14,000.00 |
|||
|
|
----------- |
|
|||
|
Total sales -parts |
14,000.00 |
31,000.00 |
|||
|
Sales - services |
6,000.00 |
12,000.00 |
|||
|
Sales - services |
2,000.00 |
4,000.00 |
|||
|
|
------------ |
------------ |
|||
|
Total sales services |
8,000.00 |
16,000.00 |
|||
|
|
------------ |
------------ |
|||
|
Total sales |
$ 29,000.00 |
$ 72,000.00 |
|||
Text
This prints the text you specify from the Text File (see the chapter titled Texts). On the layout entry screen, the text description is displayed next to the text number you enter, but what will print on the statement is the actual text from the Text File.
|
Example |
Suppose that text #1, named Disclaimer in the Text File read: |
|
This financial statement is unaudited and |
|
without opinion expressed by |
|
--your CPA firm prints here-- |
Layout Entered (Operating Statement Format Layout):

Resulting Statement:

Literal
This code prints exactly (literally) whatever you type next.You can enter up to 50 characters to print. The literal begins at the first column of the statement, so if you wish it to appear indented, space over to the desired starting position for the first character. (If you wish it to appear centered on the statement, answer Y when Center? appears).
Layout Entered (Operating Statement Format Layout):

Resulting statement:

Two functions cause subtotaling, with the subtotal printed (SUB) or not printed (CLS). The examples below illustrate how each is used.
Subtotal
This code causes a subtotal to be printed on the statement.(SUB1 is the lowest level. SUB9 is the highest level.)
SUB totals the balances of all accounts which have been either:
| • | Printed using Prt/Accum = P, or |
| • | Printed using a PAT or PATR code. (PATR is described in the Balance Sheet Format section of this chapter.) |
Accumulated account totals will not add into subtotals until they are shown by using a printing account or PAT code. So if a subtotal appears between an accumulated account and a printed account or PAT code, the amount of the accumulated account will not appear in that subtotal.
Subtotals can be printed in any sequence on a financial statement.
Enter the code.After you enter a SUB, a field appears which is used for printing accounting ratios. If no accounting ratios are to be printed on the statement, leave this field blank. Refer to the section titled Accounting Ratios later in this chapter for a discussion of how this field is used.
Then enter the description of the subtotal as you want it to appear on the statement.
Parentheses control will be requested for these types of layouts:
| • | Operating Statement |
| • | Balance Sheet |
| • | Supporting Schedule (Operating Statement format) |
| • | Supporting Schedule (balance sheet format) |
After the subtotal is printed on the financial statement, any preceding subtotals are cleared, starting at level 1, up through the level number of the subtotal code.
For example, SUB1 clears any preceding level 1 subtotals only.SUB3 clears any preceding subtotals for levels 1, 2, and 3.SUB9 clears any preceding subtotals.
If the statement is a balance sheet format (balance sheet, supporting schedule, or Statement of Changes in Financial Position), a Prt col code will be requested. Choose the column number where the subtotal is to be printed: 1, 2, or 3.
As an example, here is a layout which includes two subtotal levels (1 and 5):
Layout Entered (Balance Sheet Format Layout):

Resulting Statement:

The first subtotal (on the fourth line) includes accounts 1000-000, 1010-000 and 1020-000. The second subtotal (on the seventh line) includes accounts 1040-100 and 1040-200. The last subtotal (on the last line) includes all five cash accounts.
Actually, the last subtotal (SUB5) is computed as the sum of the two SUB1’s, not the sum of the individual lines.
A subtotal level 6 could be added further down in the layout to total several level 5 subtotals.
Intervening subtotal levels can be skipped.In the example above, the SUB1’s could have been SUB3’s, and the results would be exactly the same. The fact that, in the example, SUB2’s, SUB3’s, and SUB4’s (intervening levels between SUB1 and SUB5) were skipped makes no difference.
To determine where the SUB codes go, follow the steps below:
|
Step |
Description |
|
1 |
List the accounts to be subtotaled. |
|
2 |
Draw brackets to show the subtotal structure you want. |
|
3 |
Number the brackets from left to right, |
|
4 |
Enter the SUB codes on the layout screen. |
Clear subtotal without printing
This causes the subtotals from level 1 through the level you specify to be cleared without printing.
For example, CLS1 clears preceding level 1 subtotals only. CLS3 clears preceding subtotals for levels 1, 2, and 3. CLS9 clears all preceding subtotals.
You may find this code useful in the final formatting of the financial statements you will present to your shareholders.
(After you enter the CLS1-CLS9 code, the field which appears is for printing accounting ratios. If no accounting ratios are to be printed on the statement, leave this field blank. Refer to the section titled Accounting Ratios later in this chapter.)
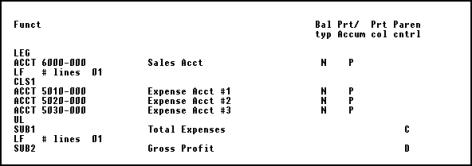
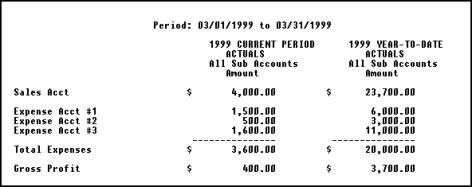
A typical use of CLS is when you are comparing one account with the total of several accounts.For example, suppose you want the statement to show:
|
|
Reporting period |
Year-to-date |
|
|
Amount |
Amount |
|
Sales Acct |
4,000.00 |
23,700.00 |
|
|
|
|
|
Expense Acct #1 |
1,500.00 |
6,000.00 |
|
Expense Acct #2 |
500.00 |
3,000.00 |
|
Expense Acct #3 |
1,600.00 |
11,000.00 |
|
|
|
|
|
Total Expenses |
3,600.00 |
20,000.00 |
|
|
|
|
|
Gross Profit |
400.00 |
3,700.00 |
But if you entered your layout like this, using SUB1 on the third line, you would not get what you want.
Layout Entered:
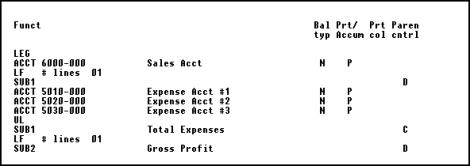
Instead, you would get:
Resulting Statement:
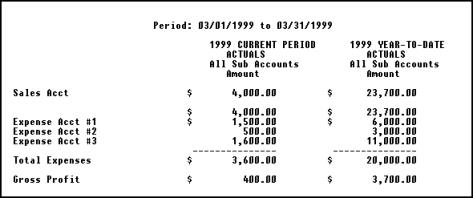
Note that the first SUB1 clears the Sales Account balance, but also causes this balance to print. Using CLS1 in place of the first SUB1 produces the desired result.
Layout Entered (Operating Statement Format Layout):
Resulting Statement:
You may define layouts which calculate various accounting ratios.
Statement Formats to Use
Accounting ratios (such as the Current Ratio) which are based on balance sheet accounts should be calculated using type X (Supporting Schedule - Balance Sheet Format) layouts.
Accounting ratios (such as Gross Profit Margin) which are based on Operating Statement accounts should be calculated using type S (Supporting Schedule - Operating Statement Format) layouts. On type S layouts, you may choose either the beginning balance, ending balance, or net change for the reporting period. Use net change to compute the ratio for just the current reporting period. Use ending balance to compute the ratio for the entire fiscal year (up to the end of the current reporting period).
Accounting ratios which are based on both balance sheet and Operating Statement accounts should be calculated using type E (Expanded Cash Flow Statement) layouts. For each account entered on this layout, you may choose either the beginning balance, ending balance, or net change for the reporting period. Choose the correct balance for each account, depending on the ratio being calculated.
|
Note |
When entering a G/L account on a type E layout, you are given a warning message if you have not defined a cash flow type for the account through Chart of Accounts. Thus, for ease of data entry, you should enter cash flow types for each account to be used on the type E layout. |
Storing Totals and Calculating Ratios
Calculating ratios on financial statements is done in a fashion similar to using a hand-held calculator.
When using a calculator, you can store calculated numbers into memory registers.
When printing financial statements, you can store an account total that has been printed on the financial statement into one of 9 different memory registers. Then, calculations can be performed on these memory registers in order to compute the accounting ratio. The value in a memory register can then be printed on the financial statement in order to print the accounting ratio.
When entering any of the following codes, you may specify a memory register into which the printed total is to be placed:
|
SUB |
|
PAT |
|
PATR |
|
CLS |
Note that for CLS, the total is not actually printed on the financial statement -- it is simply cleared. It is the value that is cleared which is placed in the memory register.
The following codes perform operations on memory registers:
Clear Register
Clear the memory register specified. Sets the amount in the register equal to zero.
Put Amount into Register
Put an amount entered on the layout into the memory register specified. Use this to enter a fixed amount for use in a calculation.
Make Amount in Register Positive
Make the current amount in the register be positive. For instance, 23.89 remains 23.89, but -23.89 becomes 23.89.
Calculate
Perform the arithmetic calculation of the type specified on the registers specified.Calculations allowed are:
|
CALC |
MEMA |
= |
MEMB |
plus |
MEMC |
|
CALC |
MEMA |
= |
MEMB |
minus |
MEMC |
|
CALC |
MEMA |
= |
MEMB |
times |
MEMC |
|
CALC |
MEMA |
= |
MEMB |
divided by |
MEMC |
The arithmetic operation is carried out on MEMB AND MEMC, and the result stored in MEMA.
(MEMA stands for one register, MEMB for a second one, and MEMC for a third.)
Move Contents of Register
Move the contents of MEMB into MEMA and then clear MEMB.
The entry format is MOVEMEMA = MEMB.
Copy Contents of Register
Copy the contents of MEMB into MEMA.Leave MEMB as it is.
The entry format is COPYMEMA = MEMB.
Print Amount in Register
Print the amount stored in the memory register specified.
This is used to print the accounting ratio on the financial statement.
After you enter the PMR code, you may enter a description of the ratio.
For balance sheet format, you then enter a print column and a parentheses control code. In addition to the normal D and C, you may choose to show a minus sign instead by entering -.
For a Operating Statement format, you enter just a parentheses
control code as described above.
Accounting ratios can be either:
| • | Calculated and printed along with actual statements (such as the Balance Sheet or Operating Statement), or |
| • | Calculated and printed separately, using these financial statement types: |
Operating Statement supporting schedule (type S)
Balance Sheet supporting schedule (type X)
Expanded Cash Flow Statement (type E)
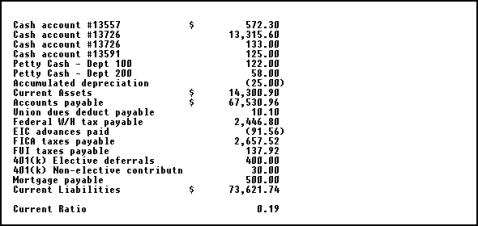
For instance, suppose you want to calculate, on a separate statement, the current ratio (the number of times current liabilities can be covered with current assets, calculated as current assets/current liabilities).
Let us assume that accounts 1000 through 1500 represent current assets, and that accounts 2000 through 2500 represent current liabilities.
Layout Entered

Resulting Statement:
Quick Ratio (Acid-Test Ratio):
(Current Assets - Inventory) / Current Liabilities
With Current Assets in MEM1, Inventory in MEM2, and Current Liabilities in MEM3:

Gross Profit Margin:
Gross Profit / Net Sales
With Gross Profit in MEM1 and Net Sales in MEM2:

Operating Profit Margin:
Operating Profit/Net Sales
With Operating Profit in MEM1 and Net Sales in MEM2:

Net Profit Margin:
Net Earnings/Net Sales
With Net Earnings in MEM1 and Net Sales in MEM2:

This section describes how Operating Statement format statements are printed and other features available only on Operating Statement format statements.
Print Format
As noted, the examples show two columns for each account or subtotal printed on a statement in Operating Statement format:
| • | The amount for the reporting period |
| • | The year-to-date amount |
The two amounts will appear in fixed columns on the statement:
|
|
Reporting period |
Year-to-date |
|
|
Amount |
Ratio |
Amount |
Ratio |
|
Sales - tools |
999.99 |
|
999.99 |
|
|
Sales - tools |
999.99 |
|
999.99 |
|
Budgets or comparatives may be selected to print in any columns. Budgets or comparatives are selected in Financial statements (Enter specifications).Columns may show the reporting period amount or the year-to-date amount.
Ratios (described next) are allowed for the Operating Statement and the Operating Statement Supporting Schedule. Ratios are not allowed on other types of statements. The percentage figures will appear just to the right of the amounts on the statement. (Ratios may be shown for budgets and comparatives as well, if they are printed.)
For the Expanded Cash Flow Statement, neither ratios, budgets, nor comparatives can be used.
For the SAF statements, only comparatives can be used.
A variance is either a difference from one column to another. Variances are printed both as a number and as a percentage.
Variances can be selected for any operating statement on which a difference can be printed, except the Expanded Cash Flow Statement. (Refer to the chapter titled Financial Statements.)
Ratios are percentage figures based on some larger amount such as total sales or total revenue.
In order to provide ratios (percentages) on Operating Statement type statements and schedules, you must define the amount against which other amounts are to be compared.
You may calculate and print either general ratios or selected ratios. Each is described below.
General Ratios
This is used to compute ratios for an entire statement, based on one total amount (basis) which you specify by inserting codes for start computing and printing ratio (SR) and end computing and printing ratio (ER).
The SR code comes before the first account on the layout that is to be included in the ratio basis amount. The ER code follows the last amount that is to be included.
For example, if the total for all accounts between the SR and the ER is $1,000, and a particular account is printed with an amount of $15.00, its ratio would be printed as 1.50%.
These percentage figures will appear just to the right of each amount printed on the statement.
Only one pair of SR and ER codes can be defined for a layout.
Layout Entered (Operating Statement Format Layout):

Resulting Statement:

Note that the ratio also prints for Total Expenses, even though SUB1 Total Expenses was after the ER. In fact, the SR/ER codes will cause a ratio to print on every line containing an amount.
If you do not want the ratio to print on every line containing an amount on the statement, or you want to show more than one ratio, use Selected Ratios, which are described next.
These codes are used when you want to print a ratio for selected (rather than all) lines on a statement, or print more than one ratio.
The set of accounts which are to be included in the calculation of the basis for the ratio are bounded by the SR and ER codes.
The set of account lines on which the ratios are printed are bounded by the SPR and EPR codes.
These sets of accounts may be different, depending on where these codes are placed on the layout.
When printing a particular statement, only those selected ratios included on the financial statement specification (entered through Enter specifications in Financial statements) will be printed.
Compute Selected Ratio
Enter a pair of SR/ER codes to define the set of accounts which are to be included in the calculation of the basis for the ratio.
The SR code comes before the first account on the layout that is to be included.The ER code follows the last account that is to be included.
Up to 9 pairs of SR/ER codes (SR1/ER1 through SR9/ER9) can be entered for a statement.
Note that these are not levels of selected ratios, like SUB1-SUB9 codes indicate levels of subtotals. The number just designates a pair of SR/ER codes.This also applies to SPR and EPR (next).
Print Selected Ratio
Enter a pair of SPR/EPR codes to define the set of account lines on which the corresponding calculated ratios are to print.
For instance, the ratios calculated from the accounts bounded by SR3/ER3 would print on the lines bounded by SPR3/EPR3.
The SPR code comes before the first account line on which the ratio is to be printed. The EPR code follows the last account line on which the ratio is to be printed.
Many pairs of SPR/EPR codes may be entered for each pair of SR/ER codes entered.
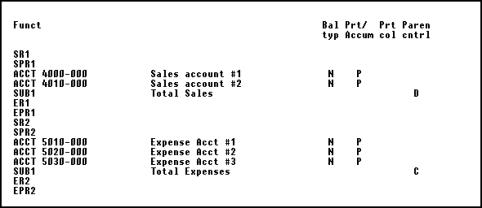
Here is an example:
Layout Entered (Operating Statement Format Layout):
Resulting Statement:

(This assumes that both SPR1 and SPR2 were selected for printing in Specifications in Financial statements. If only SPR1 was selected, only the sales account ratios would print.)
The texts and literals described below are printed only if the corresponding selected ratio is printed.
For example, if Selected Ratio 5 (SR5) is chosen for printing (through Specifications in Financial Statements), any TXT5’s and LIT5’s on the layout will also be printed.
Text Associated with Selected Ratio
This prints the text you specify from the Text File (see the chapter titled Texts). The text description is displayed next to the text number you enter, but what will print on the statement is the actual text in the Text File.
Literal Associated with Selected Ratio
This prints exactly (literally) whatever you type next.You can enter up to 50 characters to print. The literal will begin at the first column of the statement, so if you wish it to appear indented, space over to the desired starting position for the first character. (If you want it to appear centered on the statement, answer Y when Center? appears.)
Type E layouts are used for creating the financial statements required by Statement of Financial Accounting Standards No. 95 issued by the Financial Accounting Standards Board.
This publication requires accounting entities to provide a detailed statement of cash flows, together with a statement that reconciles net income to the cash flows from operations.
We recommend that preparation of these layouts be done in consultation with your accountant, who will have the intimate knowledge of your business activities necessary for an accurate representation of these detailed statements.
This E type layout is not restricted to the above statements relating to cash flows, but is in fact a very powerful and versatile tool for showing changes in any series of accounts.
The features that provide this versatility are:
| • | You can include both Balance Sheet and Operating Statement accounts on these layouts. |
| • | You can select one of five different balance types for use: |
Beginning balance
Gross debits
Gross credits
Net change
Ending balance
| • | You can reverse the balance for the current layout line by specifying that it be multiplied by minus one. |
| • | You can override the parentheses control code of an account for the current layout line. |
These features provide the means to produce almost any kind of statement in the Operating Statement format.
Three types of financial statements use the Balance Sheet Format:
|
B |
Balance Sheet |
|
X |
Supporting Schedule (balance sheet format) |
|
F |
Statement of Changes in Financial Position |
The first specification for a balance sheet selects an amount (normally current year ending balance) to print in one of three columns.
You select a print column (Prt col) when you enter a layout line that prints a balance. You also select a print column when you enter a layout line that prints an underline or a double underline.)
For example:
|
Cash - First National Bank |
2,000.00 |
|
|
|
Cash - First State Bank |
1,000.00 |
|
|
|
Cash - City Bank and Trust |
4,000.00 |
|
|
|
Total Cash in Bank |
|
7,000.00 |
|
|
Petty Cash - Dept 100 |
500.00 |
|
|
|
Petty Cash - Dept 200 |
300.00 |
|
|
|
Total Petty Cash |
|
800.00 |
|
|
Total Cash |
|
|
7,800.00 |
Ratios or selected ratios are not allowed with the balance sheet format.
Budgets or comparative amounts may be specified for additional columns on the right hand side of the page when selected in the financial statement specification. In the specification you are allowed to have one of two column arrangements on the right hand side. If you select the option that has another trio of columns, the entry in print columns (Prt col) is used to select among the columns on that side also. If you select the option that has a single column, all figures and underscores print in that column.
The Print Accumulated Total with Rounding Error and Balance Sheet Net Income are two function codes used only on balance sheet format statements:
Print Accumulated Total with Rounding Error
This code is the same as PAT, except it is used on balance sheets to indicate that if the balance sheet is printed with dollar rounding (as specified in Enter specifications under Financial statements), any rounding error is to be buried into this PATR.
Only one such PATR should appear on a balance sheet. If more than one appears, only the first one is used to bury the rounding error. The other PATR’s are ignored.
When printing a rounded Balance Sheet, the PATR code will always make the Balance Sheet appear to be in balance, even if the corresponding unrounded Balance Sheet is out of balance. The Balance Sheet will appear to be in balance because the amount by which the Balance Sheet is out of balance is buried along with the rounding error.
Because of this situation, the software verifies that the unrounded amounts are in balance even when printing a rounded Balance Sheet.If there is an out of balance situation, an error message will appear at the end of the rounded Balance Sheet statement.
(After you enter the PATR code, the field which appears is for printing accounting ratios.If no accounting ratios are to be printed on the statement, leave this field blank.See the section titled Accounting Ratios earlier in this chapter.)
Balance Sheet Net Income
This code is valid for these layout types:
| • | Balance Sheet |
| • | Supporting Schedule (balance sheet format) |
| • | Cash Flow Statement |
| • | Statement of Changes in Financial Position |
The calculated net income from the Operating Statement will appear at this line of the financial statement.
All Balance Sheets must include this code in order to balance.
You are requested to enter Prt/Accum ? (print/accumulate ?). Enter P or A, as appropriate. If P is entered, Prt col will be requested. Enter 1, 2, or 3.
Except for Expanded Cash Flow Statement (type E) layouts, the parentheses control is always assumed to be D, since net income is typically credit.
For type E layouts, you can reverse the balance of BSNI and override the parentheses control. This is useful when creating statements showing reconciliation of net income to cash flows from operations.